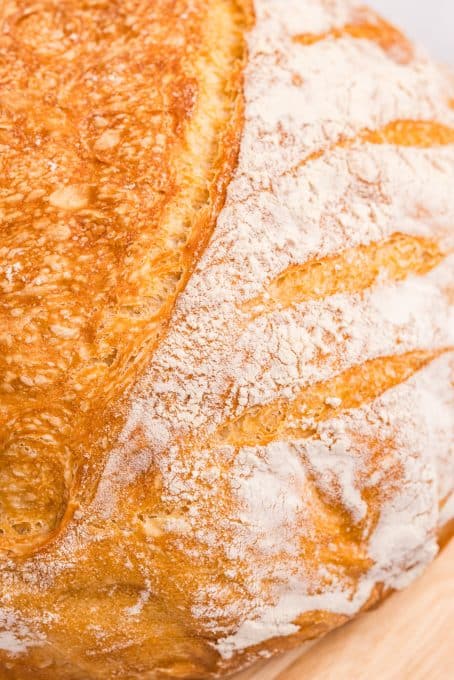
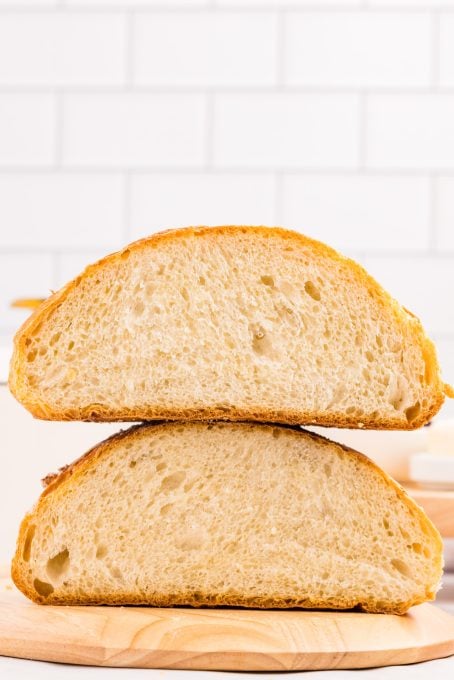
Dutch Oven Bread is a rustic, artisan-style crusty bread with a golden, chewy crust and a soft, airy interior. This easy no-knead bread recipe makes a flavorful bread that’s perfect for sandwiches, toasting, or simply enjoying with butter!
There’s nothing like the aroma of freshly baked bread! I love serving it with dinner and snacking on it the next day. It’s particularly great during soup season when I can pair it with my Creamy Tomato Basil Soup or Instant Pot Pizza Soup.
SAVE THIS DUTCH OVEN BREAD RECIPE TO YOUR FAVORITE PINTEREST BOARD!
What is the point of no-knead bread?
No-knead bread is a kind of “hands-off” approach to bread making. Instead of spending time kneading the dough to develop the gluten, the dough relies on rise time. This is a great recipe to make the night before so you’ll have fresh bread the next day.
What is a Dutch Oven?
A Dutch oven is a large, heavy cooking pot with a lid. They are often made from cast iron, but can also be made from other materials like aluminum or ceramic.
I always thought Dutch ovens were only used for campfire cooking or thought they were too expensive, so I avoided them for many years. And yes, some of them, especially the top of the line, better quality Dutch ovens can be a bit more expensive, but you can also find some that will fit your budget. Plus, besides baking bread, you can use them in your oven to slow cook all sorts of things, like soups, stews, meat, and bread! Think of your Dutch oven as more of an investment that will bring you many delicious recipes for years to come rather than a purchase that is just going to break the bank.
Baking Bread in a Dutch Oven
Dutch ovens are perfect for bread-making because the thick walls and heavy lid create a steamy environment, perfect for letting the dough rise.
Any rustic, crusty, or artisan bread will bake well in a Dutch oven. Try it with sourdough bread!
Use a 4 to 6-quart Dutch oven for this recipe.
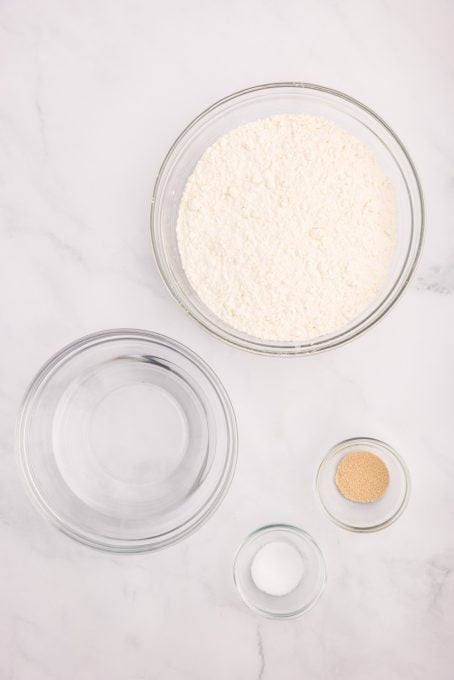
Ingredients for No Knead Bread (Dutch Oven Recipe)
This easy bread recipe only requires four simple ingredients:
Active dry yeast
Warm water
Salt (I used sea salt for this recipe)
All-purpose flour
See the recipe card at the bottom of the post for detailed ingredient amounts and instructions!
Recipe Substitutions
You can substitute instant yeast in a 1:1 ratio
You can substitute bread flour for the all-purpose flour.
I have NOT tested this no-knead bread recipe with whole wheat or gluten-free flour. If you do, I would love to have you leave me a comment, because I’m sure there will plenty of other people who would find your input very helpful as well!
Equipment Needed
You need the following items to complete this recipe:
Measuring cups and spoons
Large bowl
Sturdy wooden spoon or whisk
Plastic wrap or tea towel
Dutch oven
Parchment paper or silicone bread mat – of all the parchment I’ve ever tried, this Kirkland brand is my absolute favorite and it’s a great amount for the price.
Baking Bread in a Dutch Oven
Don’t let the long set of instructions scare you! This bread is really quite easy to make, but I want to make sure I’m explaining each step to you so you can recreate this delicious bread at home!
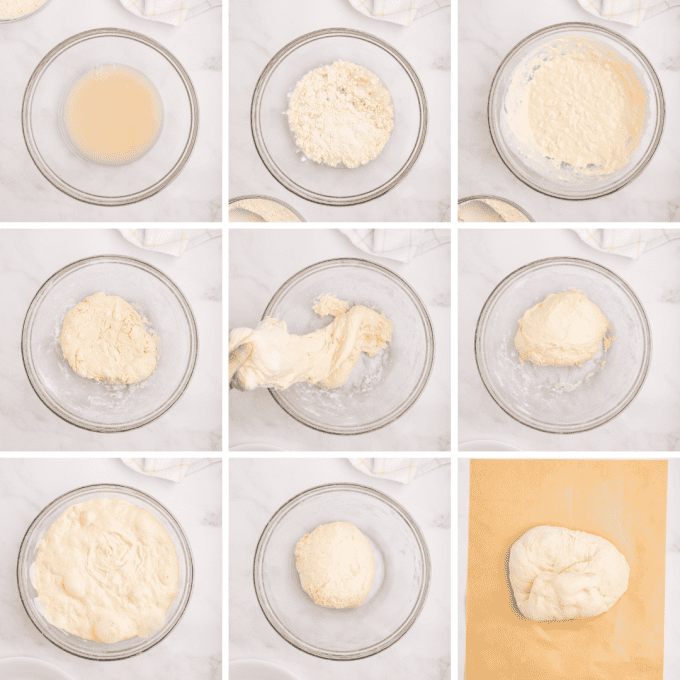
Make The Dough
In a large bowl, combine the water, yeast and salt. Stir to combine.
Add in 1 cup of flour. Stir until incorporated, and allow to sit for 5 minutes. (This will help soften the yeast.)
Slowly add in the rest of the flour, ½ cup at a time, stirring and fully incorporating it each time. The last ½-3/4 cup of flour will take a bit longer to fully incorporate. Be careful not to add too much flour– it is a sticky dough!
Once all of the flour has been added, cover the bowl with a tea towel or plastic wrap and allow it to sit on the counter for 30 minutes.
Stretch and Fold
After 30 minutes, start the first batch (of 3) of stretch and folds.
Wet your hands with water and pull one side of the dough up and fold over towards the center and top of the dough. Turn the bowl a quarter turn, take the next section of the dough (that’s attached to the sides of the bowl), and repeat the stretch and fold. Repeat this process until all of the dough has been folded towards the center. Cover and allow the dough to sit for 30 minutes.
Repeat the stretch and fold process 3 times (once every 30 minutes).
Set the dough on the counter for 4 hours or place it in the refrigerator overnight.
If you place the dough in the refrigerator overnight, follow this step: In the morning, pull out the dough from the refrigerator and allow it to come to room temperature for about 30 minutes to 1 hour.
Prepare and Bake
About 30 minutes before the dough is ready to be baked, prepare your Dutch oven by placing it on the lowest rack of your oven. Preheat the oven to 425°F.
Allowing your Dutch oven to warm up along with the oven will prevent damage from occurring.
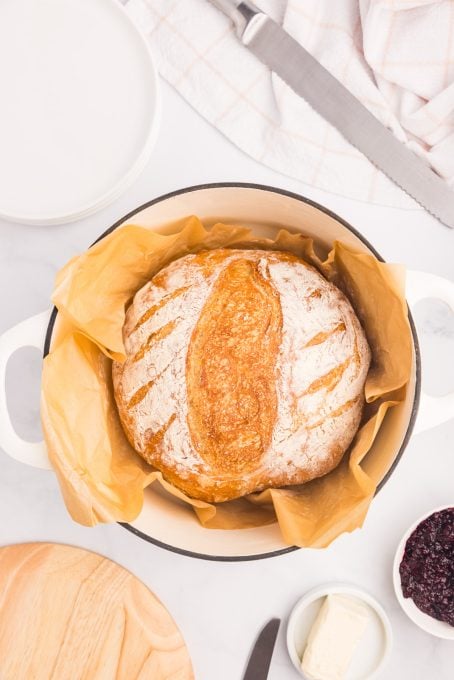
Gently remove the bread dough from the bowl, form it into a round ball, and place it onto a piece of parchment paper.
Once the oven has come to temperature, place the dough ball with the parchment paper inside the preheated Dutch oven and bake with the lid on (covered) for 20 minutes.
Reduce the heat to 375°F and remove the lid of the Dutch oven. Cook for another 20 minutes or until the top of the bread is golden brown and you hear a hollow sound when you tap on the top.
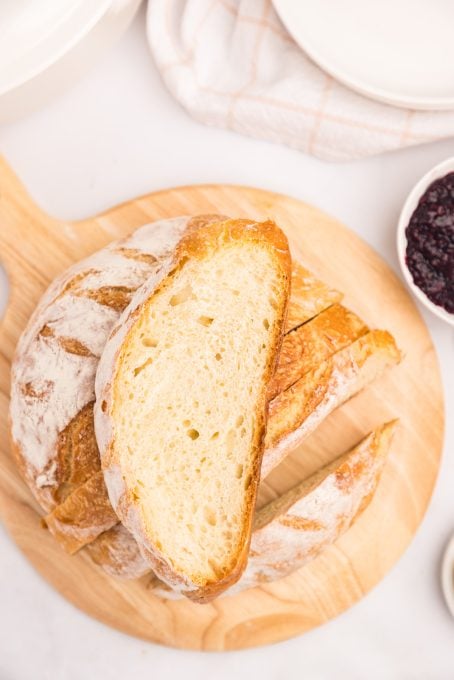
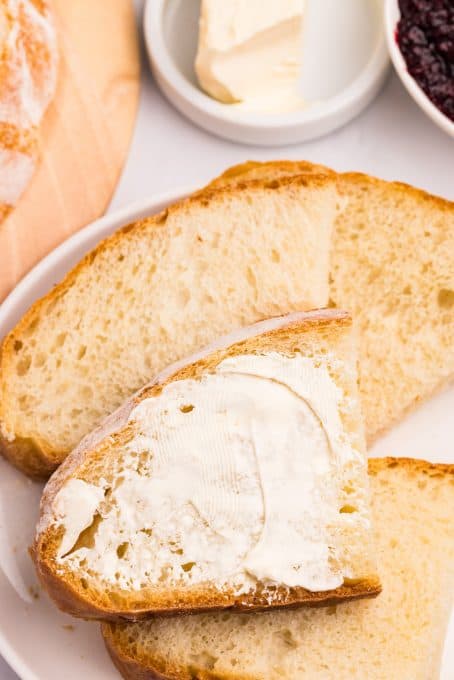
Remove the bread from the hot Dutch oven and place it on a wire rack to cool. Let the bread cool for at least 15 minutes before cutting into it. Slice it with a serrated knife and serve with butter or as a side with your favorite soup, pasta, or main dish!
Tips for Perfect Dutch Oven Bread
Working with yeast can be intimidating but with these tips, you’ll feel like a pro in no time.
This is meant to be a no-knead recipe. The stretch and fold process will help develop the gluten.
The water should be no hotter than 110°F. If the water is too hot, the yeast will burn and no longer become active which means your bread will not rise.
Allowing your Dutch oven to warm up with the oven will help prevent any damage from occurring to it.
This is a sticky dough! Make sure that you wet your hands while doing your stretch and folds; otherwise, the dough will stick to your fingers.
This recipe makes one loaf of bread and uses just 1 tsp of dry active yeast. That’s about ½ of a standard packet. You can double the batch to use a full packet or store the open packet of yeast in the freezer for another time.
I recommend measuring your ingredients using a digital scale for the best accuracy and recipe consistency.
FAQs
How do I store my Dutch oven bread?
You can store your Dutch oven bread at room temperature in an air-tight container for up to 3 days or in the refrigerator (in an airtight container) for up to 5 days. Slice what you need and store the rest. This bread makes wonderful toast, sandwiches, and French toast.
Can I make this ahead of time and freeze it?
Yes, this recipe for easy Dutch oven bread is fantastic to make ahead of time and freeze. Bake as directed and allow the loaf to cool to room temperature. Wrap the loaf in plastic wrap or aluminum foil (to prevent freezer burn) and place into a resealable bag in the freezer for 2-3 months.
You could also double the recipe, eat the first loaf now, and freeze a second one for later!
Why is my loaf of Dutch oven bread so dense and heavy?
It’s possible that you didn’t allow your dough to rise long enough. No-knead bread needs a longer rise time to help gluten to develop. A minimum of 6 hours is necessary and a longer rise window of 12 hours is ideal (hence the overnight suggestion!)
What do I serve with my Dutch oven bread?
Dutch oven bread can be served with room-temperature salted butter, jams, nut butters, cheese, or almost anything that you can think of. Here are some of my favorites.
Pasta: Serve this bread with your favorite pasta and use it to sop up the yummy sauce. Try it with my Homemade Lasagna!
Charcuterie: Add bite-sized slices of this soft bread along with Baked Brie and Whipped Goat Cheese to your charcuterie board to wow your guests.
Sandwiches: This bread has a great crust with a soft pillowy inside, perfect for sandwiches like my Leftover Turkey Sandwich.
Soup: Serve a slice of this bread alongside a warm bowl of soup.
French toast: This Dutch oven bread is perfect to soak up custard making it a great choice for French toast casserole.
More Easy Bread Recipes
If you love this Dutch Oven Bread, you might like one of these freshly baked bread recipes:
Italian Bread
Challah Bread
Rosemary Garlic Focaccia
Thanksgiving Rolls
FOLLOW ME
FACEBOOK ~ PINTEREST INSTAGRAM ~ TWITTER YOUTUBE
Keep an eye out for more of my easy recipes each week!
Want to Save This Recipe?
Enter your email & I’ll send it to your inbox. Plus, get great new recipes from me every week!
The form can be filled in the actual website url.
By submitting this form, you consent to receive emails from 365 Days of Baking and More.
Print
Dutch Oven Bread
Dutch Oven Bread is a rustic, artisan-style crusty bread with a chewy crust and a soft interior. This easy no-knead bread recipe makes a tasty bread that’s perfect for sandwiches or just spread with butter!
Course Breads
Cuisine American
Keyword Dutch Oven Bread
Prep Time 10 minutesminutes
Cook Time 40 minutesminutes
Rise Time 6 hourshours
Total Time 6 hourshours50 minutesminutes
Servings 12servings
Calories 115kcal
Author Lynne Feifer
Ingredients
1cupwarm water(110 degrees F)
1teaspoonactive dry yeast
1teaspoonsalt
3cupsall-purpose flour
Instructions
Make the Dough
In a large bowl, combine the water, yeast and salt. Stir to combine.
Add in 1 cup of flour. Stir to combine and allow to sit for 5 minutes. (This will help soften the yeast.)
Slowly add in the rest of the flour, ½ cup at a time. Pausing between each time to stir in the flour and fully incorporate. Once the last ¾-½ cup of flour is added, it will take a little longer to incorporate.
Once all of the flour has been added, cover the bowl with a tea towel or plastic wrap and allow it to sit on the counter for 30 minutes.
Stretch and Fold
After 30 minutes it’s time to start the first batch (of 3) of stretch and folds. Wet your hands with water and pull one side of the dough up and over towards the center. Turn the bowl ¼ turn and take the next side of the dough (that’s attached to the side of the bowl) and repeat the stretch and fold. Repeat this process until all of the dough has been folded towards the center. Cover and allow the dough to sit for 30 minutes.
Repeat the stretch and fold process 3 times (once every 30 minutes).
Set the dough on the counter for 4 hours or place in the refrigerator overnight. (Note: If you place the dough in the refrigerator overnight, follow this step: In the morning, pull out the dough from the refrigerator and allow it to come to room temperature for about 30 minutes to 1 hour.)
Prepare and Bake
About 30 minutes before the dough is ready to be baked, prepare your Dutch oven by placing it on the lowest rack of your oven. Preheat the oven to 425°F (Note: You will want to allow your dutch oven to warm up with the oven to prevent damage to your dutch oven.)
Gently form the dough into a ball and place it onto a piece of parchment paper.
Once the oven has come to temperature, place the dough with the parchment paper inside the Dutch oven and bake with the lid on (covered) for 20 minutes.
Reduce the heat to 375°F and remove the lid of the Dutch oven. Cook for another 20 minutes or until the top of the bread is golden brown and when you tap on the top of the bread it sounds hollow.
Remove the bread from the Dutch oven and place on a cooling rack. Allow the bread to cool for at least 15 minutes before cutting into it. Serve with butter or as a side with your favorite soup, pasta, or main dish!
Notes
You can store your Dutch oven bread at room temperature in an air-tight container for up to 3 days or in the refrigerator (in an airtight container) for up to 5 days.
Or bake as directed and cool to room temperature. Wrap the loaf in plastic wrap or aluminum foil (to prevent freezer burn) and place it into a resealable bag in the freezer for 2-3 months.